Saturday, October 6, 2007
The Rule of Thirds
Personally, I don't believe that there are rules in photography. But, I do believe that great photographs have some things in common.
The rule of thirds is the idea that a photograph can be split up into a 3x3 grid. Thirds. The main detail of each photo can be placed in any of the cross-sections. See photo below:
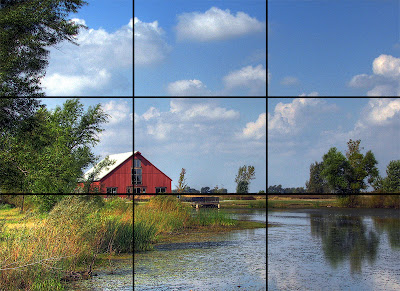
Notice that the building is smack dab in the middle of the lower left cross-sections and that the horizon follows the bottom line. Each cross-section is called a power point. Not every photograph has to follow this rule, but it does seem that great photographs have their main subject off-center.
So the next time you go out to shoot, remember the rule of thirds. Maybe instead of placing your subject smack dab in the middle of the photo, you'll think "I wonder what this would look like off-center?"
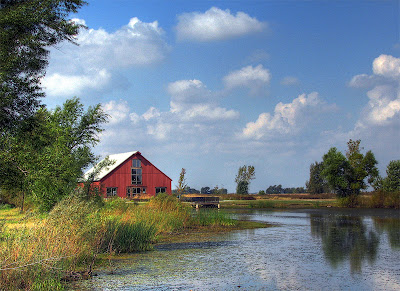
Willowhaven
Happy Shooting,
Jason
Labels: Photography RuleOfThirds Rule Of Thirds Composition Tutorial Tip Tips Tutorials
Monday, October 1, 2007
How to Create a HDR Image
What is HDR?
First of all HDR stands for High Dynamic Range. What does this mean? It basically means that the photo has a wider range of exposure than a traditional photo.
For example, if you were to take a photo through a window on a sunny day, you would get either detail of what is outside (i.e. through the window) or detail of what is inside. If you were to meter (point your camera and press the button halfway) on what is outside, the objects inside would be very dark. You probably wouldn't be able to make out great detail in the drapes or the couch, but you would see detail in the trees and clouds outside. If you were to meter (the press the button halfway thing) inside, then shoot the picture through the window, the detail outside the window would be washed out or too bright, but you would have detail of the drapes and the couch.
Here comes HDR. With HDR you take a number of different exposures of the same subject, then blend those images together getting the detail of each exposure. For our example you might take three photos. One that is over-exposed, one in the middle, and one under-exposed. Look in the manual of your camera if you are unsure how to change the exposure. The over-exposed image would give you the detail of what is inside (the drapes and couch), the middle exposure would give you some detail inside and outside, and the under-exposed image would give you the detail of what is outside (the trees and clouds). The detail of each image gets represented in one image. An HDR image.
Check out this example.

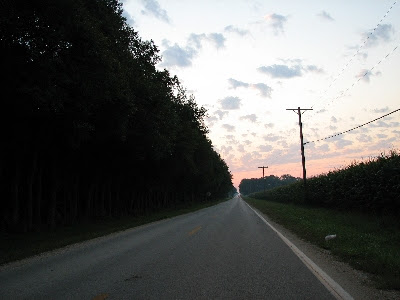
Under-Exposed - Notice the detail in the clouds.
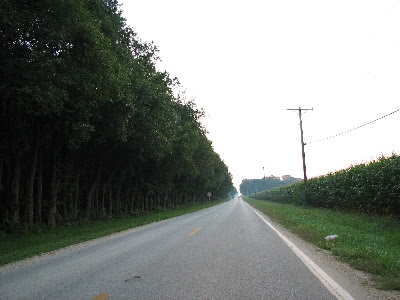
Middle - Notice the detail in the road.
Over-Exposed - Notice the detail in the trees and corn.

The HDR Image - Notice the detail in all three areas.
How do you Create an HDR Image?
Step 1 - Shoot 3 Shots:
Get your camera and a tripod (not necessary, but really helpful). Shoot three pictures of the same shot at different exposures (i.e. -2, 0, +2). It is possible to shoot more exposures and blend them into one HDR image, but for this example stick with three. Since your are taking three pictures of the same thing, the tripod will help out immensely. If your camera has Exposure Bracketing you might want to use it. Exposure Bracketing will take multiple photos at different exposures, one right after the other. If you don't use this you will have to fiddle around with your camera between shots.
It is very important to keep the camera still between shots. When you blend the photos together, any movement in the camera, will show up as somewhat of a double-vision.
Step 2 - Get the Pictures to Your PC:
Download the photos to your PC.
Step 3 - Get Some Software
The HDR Software used in this tutorial is Photomatix by HDRSoft. You can download Photomatix Pro for free, but it will put a watermark on your images. To get rid of the watermark, $99. For the Academic edition, they give you a 60% discount. They do have a free edition that you can use to blend together two photos. Their website explains it all. This tutorial uses the Pro edition.
Any after image editing can be done with whatever you have. Photoshop, Paint Shop Pro, Gimp, FreeSerifSoftware, or Picasa are some good choices. Check out all of their websites to get the details. The last three are free.
Step 4 - Blending the Photos Together
After you have downloaded and installed Photomatix, open it up. After it opens and you click through any prompts, you will want to click on "HDR -> Generate".
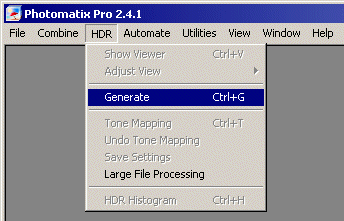
After clicking on "HDR -> Generate" the following "Generate HDR - Specifying source images" dialog box will be displayed.
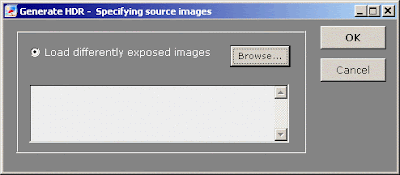
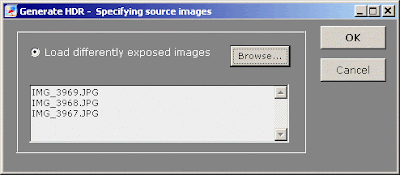
Click on "Browse", find you images, select them, then click "Open". The "Generate HDR - Specifying source images" dialog box will now show your three images listed.
Click "OK". After clicking "OK" the following "Generate HDR - Options for merging source images to HDR" dialog box will be displayed.
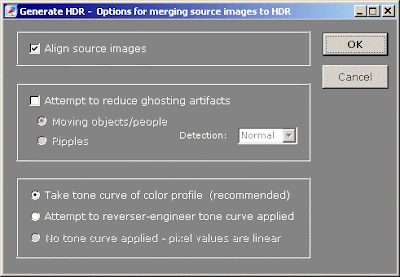
You have the following options on this dialog box.
"Align source images" will align you images. If you didn't use a tripod I would leave this checked, unless you are 100% certain the images are aligned. One tip for checking alignment is to review them in your camera right after you have taken the photos. By switching back and forth between your photos, you should be able to tell if they are aligned or not. For example, pick out an stationary object in your photo. As you switch between your differently exposed images, the stationary object should remain in the same place.
"Attempt to reduce ghosting artifacts" will try to remove any objects that were moving in the scene. Imagine you shot three photos of a beach scene. More than likely the people on the beach were moving when the photo was taken. That movement will show up when you blend the photos together. Play around with the options to find what is best for the HDR you are trying to do. If there were no moving objects in your photo, then you can ignore this option.
The last section gives you two options. Not sure why the third is always greyed out. I always use the recommended option.
Click "OK".
After clicking OK, Photomatix will run some processes and display an HDR image on the screen. You are not done yet. Next you will want to click on "HDR -> Tone Mapping".
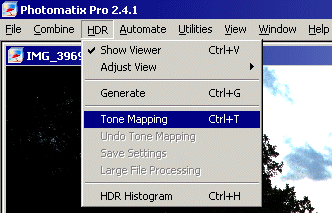
After clicking that link you image will be displayed in the "Tone Mapping" dialog box with a bunch of options.
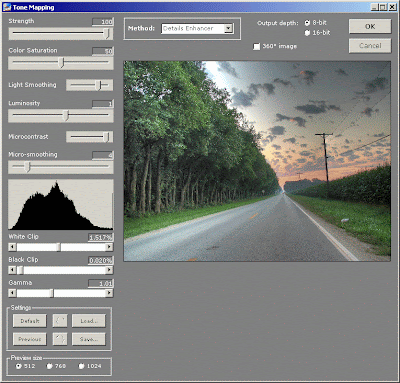
Play with the options, until you get what you want, then click "OK". Each image will more than likely require different settings. The help section that comes with Photomatix explains each option.
I usually keep "Strength" at 100 and "Color Saturation" at 50. If I want to add saturation I'll add it later with photo editing software. For "Light Smoothing" it depends on the image. Sliding the slider to the right for a setting of 2 will give you a more natural look to the image. "Luminosity" also depends on the image. This I usually put somewhere in the middle. "Microcontrast" seems to look best at 2. "Micro-smoothing" depends on the image as well. I usually leave this at the lower end to get more detail. "White Clip" and "Black Clip" will add contrast to your photo. Once again it depends on the image. Set it however you like. I set "Gamma" at 1 and usually never touch it.
Once you have all of your setting set how you like them, click "OK".
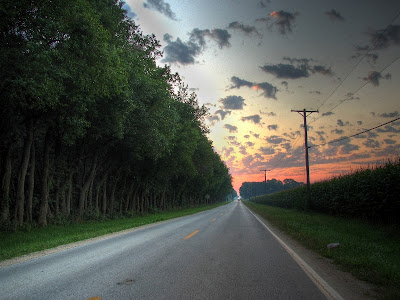
Photomatix will process the image, then spit out the final HDR image. Next you will want to save the image, so go to "File -> Save As" and save it.
Once you are done with Photomatix open your favorite image editing program to do any other editing and you might end up with something similar to this.
Good Luck!
You can view my photos on Flickr by clicking here.
First of all HDR stands for High Dynamic Range. What does this mean? It basically means that the photo has a wider range of exposure than a traditional photo.
For example, if you were to take a photo through a window on a sunny day, you would get either detail of what is outside (i.e. through the window) or detail of what is inside. If you were to meter (point your camera and press the button halfway) on what is outside, the objects inside would be very dark. You probably wouldn't be able to make out great detail in the drapes or the couch, but you would see detail in the trees and clouds outside. If you were to meter (the press the button halfway thing) inside, then shoot the picture through the window, the detail outside the window would be washed out or too bright, but you would have detail of the drapes and the couch.
Here comes HDR. With HDR you take a number of different exposures of the same subject, then blend those images together getting the detail of each exposure. For our example you might take three photos. One that is over-exposed, one in the middle, and one under-exposed. Look in the manual of your camera if you are unsure how to change the exposure. The over-exposed image would give you the detail of what is inside (the drapes and couch), the middle exposure would give you some detail inside and outside, and the under-exposed image would give you the detail of what is outside (the trees and clouds). The detail of each image gets represented in one image. An HDR image.
Check out this example.

Under-Exposed - Notice the detail in the clouds.

Middle - Notice the detail in the road.

Over-Exposed - Notice the detail in the trees and corn.

The HDR Image - Notice the detail in all three areas.
How do you Create an HDR Image?
Step 1 - Shoot 3 Shots:
Get your camera and a tripod (not necessary, but really helpful). Shoot three pictures of the same shot at different exposures (i.e. -2, 0, +2). It is possible to shoot more exposures and blend them into one HDR image, but for this example stick with three. Since your are taking three pictures of the same thing, the tripod will help out immensely. If your camera has Exposure Bracketing you might want to use it. Exposure Bracketing will take multiple photos at different exposures, one right after the other. If you don't use this you will have to fiddle around with your camera between shots.
It is very important to keep the camera still between shots. When you blend the photos together, any movement in the camera, will show up as somewhat of a double-vision.
Step 2 - Get the Pictures to Your PC:
Download the photos to your PC.
Step 3 - Get Some Software
The HDR Software used in this tutorial is Photomatix by HDRSoft. You can download Photomatix Pro for free, but it will put a watermark on your images. To get rid of the watermark, $99. For the Academic edition, they give you a 60% discount. They do have a free edition that you can use to blend together two photos. Their website explains it all. This tutorial uses the Pro edition.
Any after image editing can be done with whatever you have. Photoshop, Paint Shop Pro, Gimp, FreeSerifSoftware, or Picasa are some good choices. Check out all of their websites to get the details. The last three are free.
Step 4 - Blending the Photos Together
After you have downloaded and installed Photomatix, open it up. After it opens and you click through any prompts, you will want to click on "HDR -> Generate".

After clicking on "HDR -> Generate" the following "Generate HDR - Specifying source images" dialog box will be displayed.

Click on "Browse", find you images, select them, then click "Open". The "Generate HDR - Specifying source images" dialog box will now show your three images listed.

Click "OK". After clicking "OK" the following "Generate HDR - Options for merging source images to HDR" dialog box will be displayed.

You have the following options on this dialog box.
"Align source images" will align you images. If you didn't use a tripod I would leave this checked, unless you are 100% certain the images are aligned. One tip for checking alignment is to review them in your camera right after you have taken the photos. By switching back and forth between your photos, you should be able to tell if they are aligned or not. For example, pick out an stationary object in your photo. As you switch between your differently exposed images, the stationary object should remain in the same place.
"Attempt to reduce ghosting artifacts" will try to remove any objects that were moving in the scene. Imagine you shot three photos of a beach scene. More than likely the people on the beach were moving when the photo was taken. That movement will show up when you blend the photos together. Play around with the options to find what is best for the HDR you are trying to do. If there were no moving objects in your photo, then you can ignore this option.
The last section gives you two options. Not sure why the third is always greyed out. I always use the recommended option.
Click "OK".
After clicking OK, Photomatix will run some processes and display an HDR image on the screen. You are not done yet. Next you will want to click on "HDR -> Tone Mapping".

After clicking that link you image will be displayed in the "Tone Mapping" dialog box with a bunch of options.

Play with the options, until you get what you want, then click "OK". Each image will more than likely require different settings. The help section that comes with Photomatix explains each option.
I usually keep "Strength" at 100 and "Color Saturation" at 50. If I want to add saturation I'll add it later with photo editing software. For "Light Smoothing" it depends on the image. Sliding the slider to the right for a setting of 2 will give you a more natural look to the image. "Luminosity" also depends on the image. This I usually put somewhere in the middle. "Microcontrast" seems to look best at 2. "Micro-smoothing" depends on the image as well. I usually leave this at the lower end to get more detail. "White Clip" and "Black Clip" will add contrast to your photo. Once again it depends on the image. Set it however you like. I set "Gamma" at 1 and usually never touch it.
Once you have all of your setting set how you like them, click "OK".
Photomatix will process the image, then spit out the final HDR image. Next you will want to save the image, so go to "File -> Save As" and save it.
Once you are done with Photomatix open your favorite image editing program to do any other editing and you might end up with something similar to this.

Good Luck!
You can view my photos on Flickr by clicking here.
Tuesday, July 24, 2007
 Welcome!
Welcome to my blog. This blog is all about photography. It will include photography tips, tutorials, reviews, and how-to's. I hope you find the information valuable. I plan on updating it once a week.
Jason
Jason
![]()
Subscribe to Posts [Atom]